Have fun!
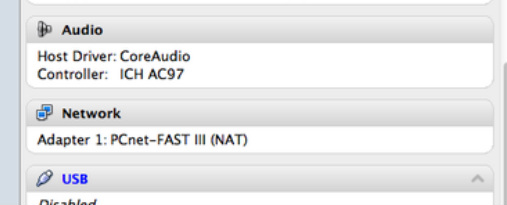
I now have the Acer C7 Chromebook which is a great second device to have offering a nice screen in a highly portable 11 inch, 3 pound package. If you would like a little more functionality, you can install on your Acer C7 Crouton, a change root (chroot) Ubuntu environment which provides easy switching between Chrome OS and Ubuntu. I like to try things in a virtual machine before going on the real deal. Crouton requires developer mode which will erase the user accounts before you enter into it. I do have many things setup such as OpenVPN and many images stored locally. The Virtualbox configuration will let me play around enough to really determine if I will try out Crouton on my Chromebook.
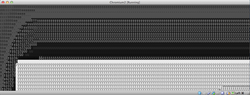
 Garbage Output 
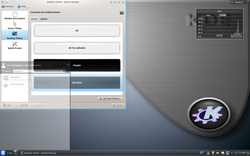
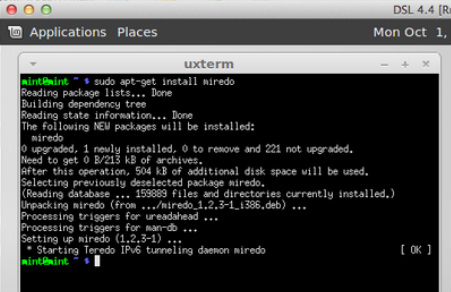
You can play around with Crouton in a virtual machine before trying it on your Chromebook and I have found it works fine, as expected, but the screen changed modes to the hideous garbage on the left during the install and the good news is there is no need to worry. I pressed CTRL-ALT-F2 followed by CTRL--ALT-F1 to get the screen back to normal. So, install Chromium using Hexxeh's instructions on his site. Then follow the Crouton install guide and if you get the garbage screen, you'll know what to do.
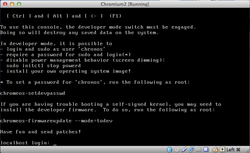
 Chromium Crosh 
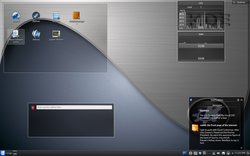
Here is the CTRL-ALT-F1, or normal Chrome OS view showing Crosh in developer mode shell right after entering the Crouton change root (chroot) environment. 
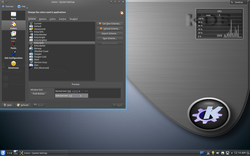
Here is the screen of CTRL-ALT-F2 
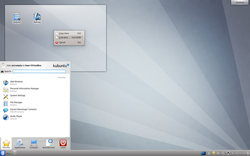
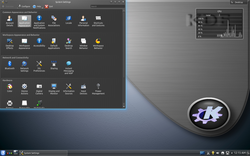
Crouton Xfce4 in Virtualbox Here is the Xfce4 session running in Crouton. Note that switching between windows doesn't always work. Sometimes getting here requires CTRL-ALT-F2 and then CTRL-ALT-F3. Have fun! The default KDE theme is nice as it is, but it can also be customized in just a few easy steps. First, I like to copy my applications into the panel. You can drag them from the launcher to the panel and select link here. Next, add some widgets using the Plasma control in the top right of the screen. Right click desktop area and select Default Desktop Settings. Install a background and select it after installation completes. Applying the desktop picture. Well go to System Settings from the Launcher and we'll use Application Appearance and Workspace Appearance. I chose Krita Dark, which comes with Kubuntu 12.10. Add a theme in WorkSpace Appearance like Slim Glow And Activate So, now you have a modified Kubuntu 12.10 KDE desktop in a few easy steps minus the time to download the custom backgrounds and themes. Hope this helps. I wrote a Home Network with IPv4 DMZ article which showed you how to get a website up and running at home on the Internet with the servers in alternate NAT area. The design works but NAT can make other services, like FTP, difficult to manage. IPv6 is ready to save us from network address translation making all nodes equal citizens on the Internet ending our dependance on IP masquerading. What do you have to do to build your IPv6 home network DMZ? The simple answer may surprise you once you realize you don't have to do anything beyond installing the software and setting up domain name service (DNS) since your IPv6 enabled node is already Internet facing. If you have enabled IPv6, you are ready to go. You can activate IPv6 at home and utilize any machine, virtual or physical, to be your Internet server. Keep in mind that virtual servers and wireless IPv6 bridging may bring you more problems than they are worth, so make sure you have wired networking available if you want to run in a virtualized machine. All you need after you install your Internet server software is a DNS provider and you are ready to go. But, many of you like something a little more complex like keeping your Internet facing systems in a nice little DMZ, away from your main network while minimizing exposure of other services that don't need to be on the Internet. To do this, I decided to create an IPv6 subnet for the DMZ within my assigned /48 block. This DMZ consists of three tiers with tier one using a globally scoped network to face the Internet clients, while tiers two and three use unique local networks. This subnet sits behind a router that has firewall rules installed on it similar to my pfSense network in the previous article. Tiers two and three cannot be reached from the Internet since their network prefixes are not routable. All servers have fully qualified domain names but the website is configured to run off the vanity URL http://azcrumpty.dyndns.org, which you can only view if you are using IPv6.
The basic building block of my IPv6 homenetwork DMZ is the Ubuntu Linux based IPv6 router. The router consists of four network interfaces: external (eth0), internet facing tier one (eth1), application logic tier two (eth2), and a database in tier three (eth3). All of these functions could have been placed on one host, of course, but doing so would have made for one boring article. This IPv6 multi-subnet Linux based router runs Ubuntu Server 12.04 in a VirtualBox virtual machine. Setup is simply a matter of setting IPv6 forwarding, net.ipv6.conf.all.forwarding=1 in the sysctl.conf file and setting static addresses on the interfaces. The bind9 and squid3 packages are installed to support domain name service forwarding and http proxying for the DMZ nodes which have no internet access. Lastly, the main router needs some static routes since the local network addresses need to be specified and I didn't subnet the router interfaces for the tier 1 LAN. Squid cache proxy needs a few tweaks to enable ACLs for the new subnets. The private block is already included so I added the tier 1 block in the ACLs: acl localnet src fd00::/7 2001:470:f379:31::/64. NTP is not used here but other virtual machines may need time synchronization so plan for it if your clock drifts while running in the virtual machine. You would set your NTP host to the corresponding router's tier network address. I wanted to build an IPv6 only environment, but Ubuntu's repository's doesn't always respond with a quad A records (AAAA) so I have to enable IPv4 on eth0 (dhclient eth0) so the proxy on the router can reach IPv4 sites for updates. This series of articles is configured for IPv6 only and the firewall script removes the IPv4 interface when run. The router software was installed with the Basic Server option menu choice in the Ubuntu server config screen. The unique local addresses are not pseudorandom, as the RFC 4193 calls for. /etc/resolv.confazcrumpty@tier1# cat /etc/resolvconf/resolv.conf.d/base nameserver 2001:4860:4860::8888 nameserver 2001:4860:4860::8844 domain chickenkiller.com search chickenkiller.com Add Static IPv6 Routes to DD-WRTAdding a static IPv6 route to your main router may be different than what lies below. ip -6 route add 2001:470:f379:30::/62 via 2001:470:f379::30 ip -6 route add fd01:470:f379:30::/62 via 2001:470:f379::30 /etc/network/interfaces# This file describes the network interfaces available on your system # and how to activate them. For more information, see interfaces(5). # The loopback network interface auto lo iface lo inet loopback # The primary network interface #iface eth0 inet dhcp # This is an autoconfigured IPv6 interface auto eth0 iface eth0 inet6 static address 2001:470:f379::30 netmask 64 gateway 2001:470:f379::1 auto eth1 iface eth1 inet6 static address 2001:470:f379:31::1 netmask 64 auto eth2 iface eth2 inet6 static address fd01:470:f379:32::1 netmask 64 auto eth3 iface eth3 inet6 static address fd01:470:f379:33::1 netmask 64 /etc/bind/named.conf.optionsThe forwarders are needed due to the IPv6 only network stack preventing some lookups. options { directory "/var/cache/bind"; // If there is a firewall between you and nameservers you want // to talk to, you may need to fix the firewall to allow multiple // ports to talk. See http://www.kb.cert.org/vuls/id/800113 // If your ISP provided one or more IP addresses for stable // nameservers, you probably want to use them as forwarders. // Uncomment the following block, and insert the addresses replacing // the all-0's placeholder. // Added Forwarders to an IPv6 Address since it can't reach IPv4 forwarders { 2001:4860:4860::8888; }; //======================================================================== // If BIND logs error messages about the root key being expired, // you will need to update your keys. See https://www.isc.org/bind-keys //======================================================================== dnssec-validation auto; auth-nxdomain no; # conform to RFC1035 listen-on-v6 { any; }; };
Generating firewall rules tend to be the most discussed subject, but you must tell Firewall Builder that you wish to work with IPv6 in the property file to have it generate the rules you want. I had assumed if I defined IPv6 addresses that it would automatically make the configuration IPv6 ready, which wasn't the case. So, I had to activate some settings in the GUI but the policy setting is the most important. Neighbor discovery and rule generation order aren't used here as IPs are static and there are no IPv4 rules. This firewall design exists to prevent the hosts in the DMZ from reaching the home IPv6 network while ensuring the Internet clients can reach the tier 1 reverse proxy, but still enabling flow from tier 1 to tier 2 and tier 2 to tier 3. The firewall design allows all hosts on the main network to reach all tiers in the DMZ. The first few rules in the diagram are anti-spoof rules (Rule 0) which prevent the internal networks from being spoofed outside the firewall where they could not originate as source addresses. Next, Rule 1 allows loopback rules and Rule 2 allows the firewall to accept IPv6 multicasts on its external interface. Next, Rule 3 lets the router's external interface connect to the outside world so the router's services can reach the Internet as needed. This helps the squid proxy and DNS queries reach the Internet. Without it, there would be no access to the Internet for the router itself. Rule 4 is redundant but it is a holdover from the template allowing SSH from the main network to the router. The router doesn't run SSH so this is not needed as I make changes on the router via the console. Some people like to SSH into the router, but I find I rarely do once I have a router setup just right. Rules 5, 6, and 7 allow each to reach the services it needs on the tier's gateway interface in this case network time protocol (NTP), http proxy, and domain name service (DNS). The block all rule (Rule 8) is next denying all other access to the firewall for whatever wasn't defined as being allowed. Rule 9 makes ident functions reject quickly so no delays exist when an application tries to do an ident call to one of the servers. Rule 11 allows mail to anywhere but Main Network and Tiers 2 and 3. Tiers 2 and 3 have no reverse DNS and many mailer daemons complain anyway. Tiers 2 and 3 can send mail to tier 1 so tier 1 could be configured as a smart relay host, which isn't shown in this series of articles. Rule 12 allows tier 1 to reach tier 2 via HTTP. You can add Apache Tomcat HTTP/AJP (8080/8009) or similar ports you need for tier 2 access here. Rule 13 allows the tier two server to reach tier three's MySQL port for database access. Note that multiple servers within each tier would have full access to all ports on all servers within the same tier using the configuration as servers on the same tier don't pass through the firewall interface for analysis. Rule 14 denies any other access to the home IPv6 network but is already covered by Rule 17. I like to see this one explicitly defined but it isn't really necessary. Rule 15 allows the main network to do whatever it wants to any host in the DMZ. You might want to restrict this to trusted hosts or a jump server in your network. Rule 16 allows any host to reach the HTTP and HTTPS ports and savvy readers will note that also enables tiers 2 and 3 to reach tier 1 HTTP services. Rule 17 denies all other connections that aren't allowed. Fire wall rules don't have to stop here. I could have told the DD-WRT router to deny all incoming connections from the networks 2001:470:f379:31://64 and fd01:/16 and I could tell the host based firewalls on hosts in the main network to drop those networks as well. The following section shows the external test network is denied when trying to reach hosts. Oct 3 19:27:45 router kernel: [1187749.075419] RULE 17 -- DENY IN=eth1 OUT=eth3 MAC=08:00:27:88:a2:52:08:00:27:b6:01:80:86:dd SRC=2001:0470:f379:0031:0000:0000:0000:0010 DST=fd01:0470:f379:0033:0000:0000:0000:0030 LEN=80 TC=0 HOPLIMIT=63 FLOWLBL=0 PROTO=TCP SPT=40715 DPT=22 WINDOW=14400 RES=0x00 SYN URGP=0 Oct 3 14:27:53 router kernel: [1187757.100207] RULE 17 -- DENY IN=eth1 OUT=eth3 MAC=08:00:27:88:a2:52:08:00:27:b6:01:80:86:dd SRC=2001:0470:f379:0031:0000:0000:0000:0010 DST=fd01:0470:f379:0033:0000:0000:0000:0030 LEN=80 TC=0 HOPLIMIT=63 FLOWLBL=0 PROTO=TCP SPT=40715 DPT=22 WINDOW=14400 RES=0x00 SYN URGP=0 Oct 3 19:28:09 router kernel: [1187773.131684] RULE 17 -- DENY IN=eth1 OUT=eth3 MAC=08:00:27:88:a2:52:08:00:27:b6:01:80:86:dd SRC=2001:0470:f379:0031:0000:0000:0000:0010 DST=fd01:0470:f379:0033:0000:0000:0000:0030 LEN=80 TC=0 HOPLIMIT=63 FLOWLBL=0 PROTO=TCP SPT=40715 DPT=22 WINDOW=14400 RES=0x00 SYN URGP=0 Oct 3 19:29:31 router kernel: [1187855.193762] RULE 17 -- DENY IN=eth2 OUT=eth3 MAC=08:00:27:7d:3e:91:08:00:27:b8:81:ef:86:dd SRC=fd01:0470:f379:0032:0000:0000:0000:0020 DST=fd01:0470:f379:0033:0000:0000:0000:0030 LEN=80 TC=0 HOPLIMIT=63 FLOWLBL=0 PROTO=TCP SPT=36823 DPT=22 WINDOW=14400 RES=0x00 SYN URGP=0 Oct 3 19:29:32 router kernel: [1187856.174386] RULE 17 -- DENY IN=eth2 OUT=eth3 MAC=08:00:27:7d:3e:91:08:00:27:b8:81:ef:86:dd SRC=fd01:0470:f379:0032:0000:0000:0000:0020 DST=fd01:0470:f379:0033:0000:0000:0000:0030 LEN=80 TC=0 HOPLIMIT=63 FLOWLBL=0 PROTO=TCP SPT=36823 DPT=22 WINDOW=14400 RES=0x00 SYN URGP=0 Oct 3 19:29:34 router kernel: [1187858.145339] RULE 17 -- DENY IN=eth2 OUT=eth3 MAC=08:00:27:7d:3e:91:08:00:27:b8:81:ef:86:dd SRC=fd01:0470:f379:0032:0000:0000:0000:0020 DST=fd01:0470:f379:0033:0000:0000:0000:0030 LEN=80 TC=0 HOPLIMIT=63 FLOWLBL=0 PROTO=TCP SPT=36823 DPT=22 WINDOW=14400 RES=0x00 SYN URGP=0
The tier one Internet facing server is an Ubuntu 12.04 server that runs the Squid caching proxy in reverse proxy mode, which is overkill for this site but this series of articles is just a demo so anything else can dropped into place. The server's real host name tier 1 is different from its vanity name. The configuration consists of static resolv.conf files and static interface definitions. The proxy IP and port are added to /etc/environment so services that do HTTP/FTP can reach the web. The base file for resolvconf is gets nameservice using the same interface as the proxy since the router provides these services to the host. The /etc/interfaces file has has the static assignments to activate networking. Application configuration comes next. Postfix is told to receive mail as the vanity domain azcrumpty.dyndns.org while the apt package manager is told to use the proxy. Squid Proxy server is configured to listen on port 80 which is HTTP in plaintext, connect to its peer on tier 2, and ensure ACLs are permissible. /etc/environmentazcrumpty@tier1:~$ cat /etc/environment PATH="/usr/local/sbin:/usr/local/bin:/usr/sbin:/usr/bin:/sbin:/bin:/usr/games" http_proxy="http://[2001:470:f379:31::1]:3128" https_proxy="http://[2001:470:f379:31::1]:3128" ftp_proxy="http://[2001:470:f379:31::1]:3128" /etc/resolv.confazcrumpty@tier1:~$ cat /etc/resolvconf/resolv.conf.d/base nameserver 2001:470:f379:31::1 domain chickenkiller.com search chickenkiller.com /etc/network/interfacesazcrumpty@tier1:~$ cat /etc/network/interfaces # This file describes the network interfaces available on your system # and how to activate them. For more information, see interfaces(5). # The loopback network interface auto lo iface lo inet loopback # The primary network interface #iface eth0 inet dhcp # This is an autoconfigured IPv6 interface auto eth0 iface eth0 inet6 static address 2001:470:f379:31::10 netmask 64 gateway 2001:470:f379:31::1 /etc/postfix/main.cfazcrumpty@tier1:~$ grep mydest /etc/postfix/main.cf mydestination = tier1.CHICKENKILLER.COM, tier1, azcrumpty.dyndns.org, localhost.localdomain, localhost Apt Proxy Configurationazcrumpty@tier1:~$ cat /etc/apt/apt.conf.d/00Proxy Acquire::http::Proxy "http://[2001:470:f379:31::1]:3128"; /etc/squid3/squid.conf#This file is large and only the changes are shown ... http_port 80 accel defaultsite=azcrumpty.dyndns.org ... cache_peer fd01:470:f379:32::20 parent 80 0 no-query originserver name=myAccel ... acl our_sites dstdomain azcrumpty.dyndns.org http_access allow our_sites cache_peer_access myAccel allow our_sites cache_peer_access myAccel deny all ...
The tier two server runs application logic for WordPress 3.4.2. The LAMP install option was chosen in the Ubuntu Server install page, and this server uses static configuration files for name service and network configuration like the other nodes. Note that the environment file uses tier 2 addresses unlike the tier 1 server. I could have opened the firewall ports for services to all one interface so the environment files would use the same values. WordPress was installed into /var/www and configured to talk to the MySQL database in tier three. You can see the WordPress config has the tier3 name in the database field and that all WordPress files are installed into /var/www. /etc/environment# Add proxies to environment file # azcrumpty@tier2:~$ cat /etc/environment PATH="/usr/local/sbin:/usr/local/bin:/usr/sbin:/usr/bin:/sbin:/bin:/usr/games" http_proxy="http://[fd01:470:f379:32::1]:3128" https_proxy="http://[fd01:470:f379:32::1]:3128" ftp_proxy="http://[fd01:470:f379:32::1]:3128" /etc/resolv.conf# set domain name server and domain in resolv conf base azcrumpty@tier2:~$ cat /etc/resolvconf/resolv.conf.d/base nameserver fd01:470:f379:32::1 domain chickenkiller.com search chickenkiller.com /etc/network/interfacesazcrumpty@tier2:~$ cat /etc/network/interfaces # This file describes the network interfaces available on your system # and how to activate them. For more information, see interfaces(5). # The loopback network interface auto lo iface lo inet loopback # The primary network interface #iface eth0 inet dhcp # This is an autoconfigured IPv6 interface auto eth2 iface eth2 inet6 static address fd01:470:f379:32::20 netmask 64 gateway fd01:470:f379:32::1 wp-config.phpazcrumpty@tier2:~$ grep tier3 /var/www/wp-config.php define('DB_HOST', 'tier3.chickenkiller.com'); /var/www# Note WordPress is installed into /var/www without being in a subdir azcrumpty@tier2:~$ ls -ltr /var/www total 172 -rw-r--r-- 1 wpwriter wpwriter 1997 Oct 23 2010 wp-links-opml.php -rw-r--r-- 1 wpwriter wpwriter 3177 Nov 1 2010 wp-config-sample.php -rw-r--r-- 1 wpwriter wpwriter 4264 Dec 13 2011 wp-activate.php -rw-r--r-- 1 wpwriter wpwriter 3700 Jan 8 2012 wp-trackback.php -rw-r--r-- 1 wpwriter wpwriter 271 Jan 8 2012 wp-blog-header.php -rw-r--r-- 1 wpwriter wpwriter 395 Jan 8 2012 index.php -rw-r--r-- 1 wpwriter wpwriter 2726 Jan 9 2012 wp-cron.php -rw-r--r-- 1 wpwriter wpwriter 2788 Feb 16 2012 xmlrpc.php -rw-r--r-- 1 wpwriter wpwriter 3522 Apr 10 11:21 wp-comments-post.php -rw-r--r-- 1 wpwriter wpwriter 18299 Apr 21 00:40 wp-signup.php -rw-r--r-- 1 wpwriter wpwriter 9916 Apr 26 22:54 wp-settings.php -rw-r--r-- 1 wpwriter wpwriter 7712 May 2 07:32 wp-mail.php -rw-r--r-- 1 wpwriter wpwriter 19929 May 6 01:28 license.txt -rw-r--r-- 1 wpwriter wpwriter 1354 May 13 15:41 wp-app.php -rw-r--r-- 1 wpwriter wpwriter 29084 Jun 26 12:53 wp-login.php -rw-r--r-- 1 wpwriter wpwriter 9177 Sep 3 17:23 readme.html -rw-r--r-- 1 wpwriter wpwriter 2395 Sep 4 14:31 wp-load.php drwxr-xr-x 8 wpwriter wpwriter 4096 Sep 6 13:43 wp-includes drwxr-xr-x 4 wpwriter wpwriter 4096 Sep 6 13:43 wp-content drwxr-xr-x 9 wpwriter wpwriter 4096 Sep 6 13:43 wp-admin -r--r--r-- 1 wpwriter wpwriter 3670 Sep 29 20:38 wp-config.php -rw-r--r-- 1 wpwriter wpwriter 1150 Sep 29 23:46 favicon.ico
This tier three server is configured with MySQL, Apache, and phpMyAdmin. The MySQL option was chosen in the Ubuntu Server installer page. PhpMyAdmin can only be reached internally due to the firewall rules granting access and the tier 2 and tier 3 ip addresses being local. Like tier 2, the environment must be setup to tell software to use the proxy on the nearest interface and apt-get is configured this way as well. This is seen in the configuration files below. /etc/resolv.confazcrumpty@tier3:~$ cat /etc/resolvconf/resolv.conf.d/base nameserver fd01:470:f379:33::1 domain chickenkiller.com search chickenkiller.com /etc/network/interfacesazcrumpty@tier3:~$ cat /etc/network/interfaces # This file describes the network interfaces available on your system # and how to activate them. For more information, see interfaces(5). # The loopback network interface auto lo iface lo inet loopback # The primary network interface #iface eth0 inet dhcp # This is an autoconfigured IPv6 interface auto eth2 iface eth2 inet6 static address fd01:470:f379:33::30 netmask 64 gateway fd01:470:f379:33::1
The Onion Router can be used to simulate an external network for IPv4, but Teredo Tunneling works well for the same purpose and doesn't have exit node restrictions. You will need this test network available so you can simulate external clients since your main network is fully trusted. An Ubuntu Live CD behind NAT in a VirtualBox virtual machine with miredo tunneling installed so IPv6 would be activated is all you need to get up running with an external IPv6 at your premises. Placing it behind NAT keeps it from receiving route advertisements from the main network so your IPv6 client wont be on your main IPv6 network. Boot the virtual machine and ensure a Teredo type tunnel is installed. For Ubuntu, sudo apt-get miredo does the trick. There are clients for other operating systems and GoGo6 is one of the more popular choices. You now have an external network that you can use while at home without needing to leave your premises. Configuration steps from NAT to test are shown below along with logs showing access and denial of the external client. You can see the external client accessing the reverse proxy in tier 1 below. azcrumpty@tier1:~$ sudo tail /var/log/squid3/access.log [sudo] password for azcrumpty: 1349134298.467 22 fd01:470:f379:32::20 TCP_MISS/000 0 POST http://azcrumpty.dyndns.org/wp-cron.php? - FIRST_UP_PARENT/myAccel - 1349134299.101 4625 2001:0:53aa:64c:309f:11b5:bc5a:3450 TCP_MISS/200 2568 GET http://azcrumpty.dyndns.org/ - FIRST_UP_PARENT/myAccel text/html 1349134299.220 2 2001:0:53aa:64c:309f:11b5:bc5a:3450 TCP_MEM_HIT/200 11737 GET http://azcrumpty.dyndns.org/wp-content/themes/twentyeleven/style.css - NONE/- text/css 1349134299.459 1 2001:0:53aa:64c:309f:11b5:bc5a:3450 TCP_MEM_HIT/200 909 GET http://azcrumpty.dyndns.org/wp-content/themes/twentyeleven/images/search.png - NONE/- image/png 1349134299.558 218 2001:0:53aa:64c:309f:11b5:bc5a:3450 TCP_MEM_HIT/200 68923 GET http://azcrumpty.dyndns.org/wp-content/themes/twentyeleven/images/headers/willow.jpg - NONE/- image/jpeg 1349134299.567 0 2001:0:53aa:64c:309f:11b5:bc5a:3450 TCP_MEM_HIT/200 1393 GET http://azcrumpty.dyndns.org/wp-content/themes/twentyeleven/images/comment-bubble.png - NONE/- image/png 1349134299.774 22 2001:0:53aa:64c:309f:11b5:bc5a:3450 TCP_REFRESH_UNMODIFIED/200 1524 GET http://azcrumpty.dyndns.org/favicon.ico - FIRST_UP_PARENT/myAccel image/x-icon 1349134323.274 912 2001:0:53aa:64c:309f:11b5:bc5a:3450 TCP_MISS/200 2568 GET http://azcrumpty.dyndns.org/ - FIRST_UP_PARENT/myAccel text/html 1349134323.683 223 2001:0:53aa:64c:309f:11b5:bc5a:3450 TCP_MEM_HIT/200 79982 GET http://azcrumpty.dyndns.org/wp-content/themes/twentyeleven/images/headers/shore.jpg - NONE/- image/jpeg 1349134323.949 0 2001:0:53aa:64c:309f:11b5:bc5a:3450 TCP_MEM_HIT/200 1525 GET http://azcrumpty.dyndns.org/favicon.ico - NONE/- image/x-icon Below is the firewall preventing the external client from accessing other resources. Sep 30 09:04:51 router kernel: [909175.337588] RULE 17 -- DENY IN=eth0 OUT=eth1 MAC=08:00:27:1d:0b:27:00:ff:a3:6a:23:29:86:dd SRC=2001:0000:53aa:064c:1829:2d91:bc5a:3450 DST=2001:0470:f379:0031:0000:0000:0000:0010 LEN=80 TC=0 HOPLIMIT=59 FLOWLBL=0 PROTO=TCP SPT=59320 DPT=22 WINDOW=12200 RES=0x00 SYN URGP=0 Sep 30 09:04:54 router kernel: [909177.941026] RULE 17 -- DENY IN=eth0 OUT=eth1 MAC=08:00:27:1d:0b:27:00:ff:a3:6a:23:29:86:dd SRC=2001:0000:53aa:064c:1829:2d91:bc5a:3450 DST=2001:0470:f379:0031:0000:0000:0000:0010 LEN=80 TC=0 HOPLIMIT=59 FLOWLBL=0 PROTO=TCP SPT=59320 DPT=22 WINDOW=12200 RES=0x00 SYN URGP=0 Sep 30 09:05:00 router kernel: [909183.946339] RULE 17 -- DENY IN=eth0 OUT=eth1 MAC=08:00:27:1d:0b:27:00:ff:a3:6a:23:29:86:dd SRC=2001:0000:53aa:064c:1829:2d91:bc5a:3450 DST=2001:0470:f379:0031:0000:0000:0000:0010 LEN=80 TC=0 HOPLIMIT=59 FLOWLBL=0 PROTO=TCP SPT=59320 DPT=22 WINDOW=12200 RES=0x00 SYN URGP=0
I took advantage of a FreeDNS provider for these systems. Reverse DNS only works on tier one since that uses a prefix that can be defined in the DNS provider. Hurricane Electric's tunnel broker makes delegation for reverse number to name mapping easy so use it to your advantage. All hosts are in the chickenkiller.com domain and use the simple names tier1, tier2, and tier3. However, the site uses a vanity domain of azcrumpty.dyndns.org for presentation. debian: azcrumpty$ host azcrumpty.dyndns.org azcrumpty.dyndns.org has address 0.0.0.0 azcrumpty.dyndns.org has IPv6 address 2001:470:f379:31::10
|
Journal
This is the place for notes and updates. Archives
March 2013
Categories
All
|